Getting Started
This guide takes you from a stock DJI drone and remote controller to a live telemetry stream and your first command — over MAVLink 2, HTTP, or both, since both are on by default.
Prerequisites
Section titled “Prerequisites”- DJI drone + compatible RC, 5 GHz Wi-Fi access point, ground station computer
- Android Studio Quail 3 (2026.1.3) or newer — the project builds with Android Gradle Plugin 9.3.2 and Gradle 9.7.1, which need a current release
- DJI developer account + API key from developer.dji.com
Install the app
Section titled “Install the app”git clone https://github.com/SDU-UAS-Center/lyrebird.git-
Open
Lyrebird/LyrebirdApp/android-sdk-v5-asin Android Studio. -
Create
local.propertiesfrom the template and set the Android SDK path for your machine:Terminal window cd lyrebird/LyrebirdApp/android-sdk-v5-ascp local.properties.example local.propertiesnano local.propertiesSet
sdk.dirto your Android SDK path. Example for a default Linux Android Studio install:sdk.dir=/home/your-user/Android/Sdk -
Get your DJI API key. Sign in at developer.dji.com, open Developer Center → Apps, and create a new app with these properties:
Field Value SDK Type Mobile SDK App Name Lyrebird (or any name you like) Software Platform Android Package Name com.lyrebird.rcCategory Research (or whatever fits your use) Description Any short description The Package Name must be exactly
com.lyrebird.rc— it has to match the app’sapplicationId, or the DJI SDK will reject the key at registration. After the app is created (DJI may ask you to activate it from a confirmation email first), open it from the Apps list and copy the App Key: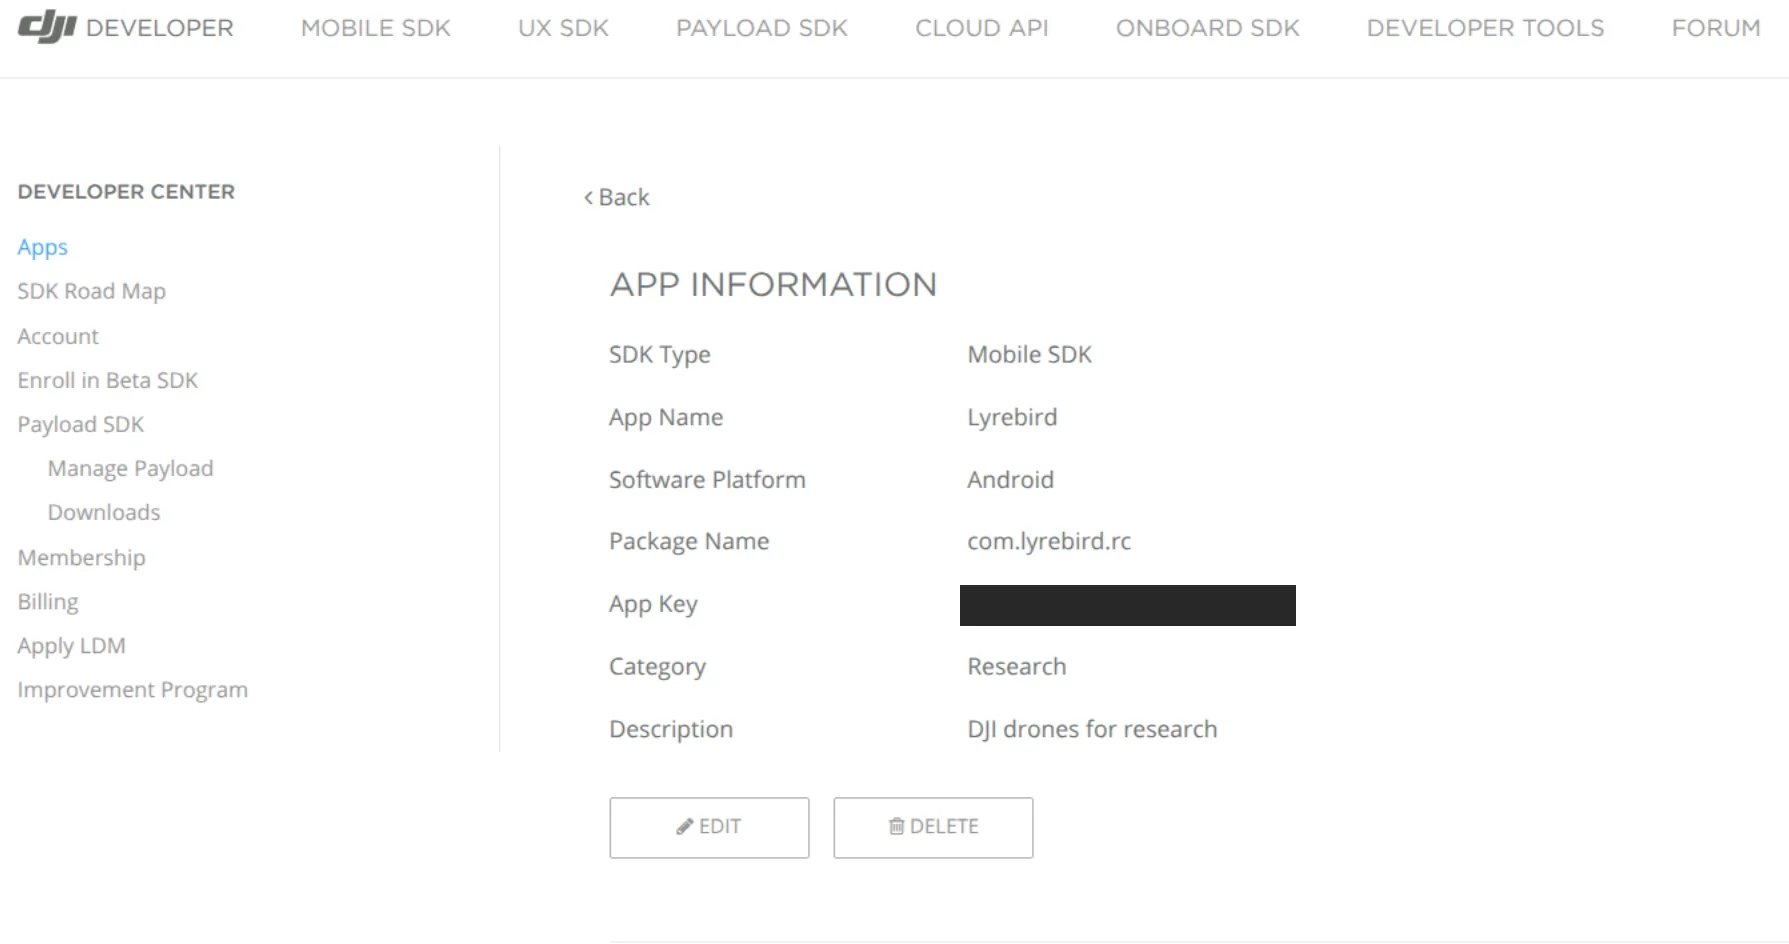
-
Add your DJI API key to
local.properties:Terminal window nano local.propertiesReplace the placeholder on the
AIRCRAFT_API_KEYline with the App Key you copied:AIRCRAFT_API_KEY=Your_App_Key -
Build and deploy to your RC or Android phone (enable Developer Mode + USB Debugging first).
Command-line build
Section titled “Command-line build”If you prefer the terminal to Android Studio, all commands below run from LyrebirdApp/android-sdk-v5-as:
cd LyrebirdApp/android-sdk-v5-asBuild, install and launch in one step
Section titled “Build, install and launch in one step”Make sure USB debugging is enabled on the RC or phone and plug it in over USB. Add adb to your PATH and check that the device shows up:
echo 'export PATH=$PATH:$HOME/Android/Sdk/platform-tools' >> ~/.bashrcsource ~/.bashrcadb devicesOn Linux, if adb devices shows no permissions, run these two commands, then log out and back in:
sudo apt install android-sdk-platform-tools-commonsudo usermod -aG plugdev $USERThen build, install and launch:
./auto_install_on_connect.sh --buildThe script builds the debug APK, waits for the device to show up in ADB (Android Debug Bridge), installs the app and starts it. Drop --build to reinstall the APK you already built (it still builds one if none exists).
The first time you connect, unlock the RC’s screen and accept the Allow USB debugging prompt. Otherwise adb devices lists it as unauthorized and the script won’t install.
If the app was previously installed with a different DJI API key, uninstall it first, then rebuild and install:
adb uninstall com.lyrebird.rc./auto_install_on_connect.sh --buildSeveral devices attached
Section titled “Several devices attached”With more than one RC or phone connected, the script stops and lists them instead of guessing which one to install on. Pick one by serial (from adb devices), or install on all of them:
./auto_install_on_connect.sh --build --serial <serial>./auto_install_on_connect.sh --build --allBuild only
Section titled “Build only”To build the APK without installing it:
./gradlew :app:assembleCurrentV5DebugThe debug APK is written to:
LyrebirdApp/lyrebird-app/build/outputs/apk/currentV5/debug/Lyrebird-current-v5-debug.apkTo check which APK the install script will use, and whether it has been built yet:
./auto_install_on_connect.sh --checkStart the server
Section titled “Start the server”- Launch the Lyrebird app on the RC — servers start automatically on the default layout.
- Note the Device IP shown in the app, call
/config, or use auto-discovery. - Press Enable Virtual Stick (via
/send/enableVirtualStickor the app UI) before sending navigation commands.
Ground station dependencies
Section titled “Ground station dependencies”uv sync # Python interface (installs the ground-station client)uv sync --group ros # ROS 2 interface (numpy + OpenCV for the ROS nodes)Connect and control
Section titled “Connect and control”Both interfaces are enabled by default — pick whichever fits, or run both side by side.
MAVLink 2 (QGroundControl, MAVSDK, pymavlink — UDP 14550)
Section titled “MAVLink 2 (QGroundControl, MAVSDK, pymavlink — UDP 14550)”Point QGroundControl at the RC’s IP address and it connects automatically — Fly View and Plan view both light up with no plugin and no configuration file. Tested with QGroundControl 5.0.8 and 5.2.0 — see Using QGroundControl for flying, video, gimbal and camera. To check the link without QGroundControl:
uv run --locked --group mavlink lyrebird-mavlink-listen --summary 5This is the lighter-weight path for flight and telemetry. See MAVLink 2 for the full command and mission surface.
HTTP + TCP (any language)
Section titled “HTTP + TCP (any language)”Kept alongside MAVLink for compatibility with ground stations built against this project’s predecessor, WildBridge, and as the API for what MAVLink doesn’t cover yet — AI detections, live settings, and big transfers. HTTP uses as much of the Wi-Fi link as it can, which is what media and video need; MAVLink FTP is deliberately slow and lightweight instead, so one aircraft’s download doesn’t crowd the radio spectrum a whole swarm shares.
Telemetry (TCP, port 8081)
Section titled “Telemetry (TCP, port 8081)”import socket, json
sock = socket.socket(socket.AF_INET, socket.SOCK_STREAM)sock.connect(("192.168.1.100", 8081))buffer = ""while True: buffer += sock.recv(4096).decode('utf-8') while '\n' in buffer: line, buffer = buffer.split('\n', 1) if line.strip(): t = json.loads(line) print(f"Battery: {t['batteryLevel']}% Alt: {t['location']['altitude']:.1f}m Sats: {t['satelliteCount']}")Commands (HTTP POST, port 8080)
Section titled “Commands (HTTP POST, port 8080)”import requests
rc = "192.168.1.100"requests.post(f"http://{rc}:8080/send/takeoff")requests.post(f"http://{rc}:8080/send/gotoWaypointNoseForward", data="49.306254,4.593728,20,90,5.0")requests.post(f"http://{rc}:8080/send/navigateTrajectoryDJINative", data="10.0;49.306,4.593,20;49.307,4.594,25;49.308,4.595,20")requests.post(f"http://{rc}:8080/send/RTH")Video (WHIP/WHEP through MediaMTX)
Section titled “Video (WHIP/WHEP through MediaMTX)”docker compose -f GroundStation/video_test/compose.yaml up -d --buildOpen the dashboard at http://localhost:8090. When the dashboard connects to a phone telemetry stream, the app builds a WHIP publish URL such as:
http://<ground-station-ip>:8889/<drone_name>/whipMediaMTX exposes the matching browser playback endpoint:
http://<ground-station-ip>:8889/<drone_name>/whepThe first WHIP connection uses the standard raw-frame/libwebrtc encoder. The app also has an opt-in Surface H264 mode (lb_whip_surface_h264_encoder) that sends DJI camera frames to an Android hardware MediaCodec encoder before the same WHIP request. It can reduce CPU-side pixel conversion, but it is experimental and requires an app restart after enabling it in Stream / WebRTC settings. If the surface path is unstable on a particular aircraft or controller, turn it off and use the standard encoder; the WHIP, MediaMTX, and WHEP URLs stay the same.
The supported public video example is defined by compose.yaml, mediamtx.yml, and the webapp in GroundStation/video_test/webapp. The older direct WebSocket-signaling viewer/server path has been removed from the public app and ground-station tooling.
Next steps
Section titled “Next steps”- Fly from QGroundControl or MAVSDK: MAVLink 2.
- Use the high-level Python client instead of raw sockets: Ground Station.
- Browse every command endpoint: HTTP API.